Thursday, January 15, 2015

Raven Concealment Systems: Eidolon

The Raven Concealment Systems folks have successfully conducted a teaser campaign for their new  holster with the hashtag, #they'llneverseeitcoming.  Pretty clever for a concealable holster if you ask me.  The guys at Raven are always looking to innovate and they've done a pretty good job at it thus far, so enter the Eidolon holster.  This holster has been years in the making.  One of my first conversations with Michael Goerlich at RCS a few years ago was that they were looking to break into the injection molded market, and now they have.  RCS products have typically been kydex.  RCS set the standard for which most kydex holsters are now measured by.  They developed the Eidolon with help from Kyle Defoor of Defoor Proformance Shooting.  Kyle has a solid reputation as a shooting/tactics instructor.


I have to give Raven Concealment the credit for all the pics here, theirs are
way better than mine.


I was privileged enough to be one of the testers of this product and have been running mine for a few months.  What I like most about this holster is the versatility.  You can configure this holster several different ways, it's ambidextrous, and it will accommodate RMRs!  What else do you need?  With this review I'm just going to post several pics to give you some idea about the holster.  As far as the performance of the holster, it's a RCS holster.  It works.  The retention is good and it provides a nice, smooth draw stroke.  The guys at Raven have been in the holster game for awhile, so the Eidolon is the quality you'd expect.  

The video below shows my first time going live with the holster.  I got a couple dry fires in and then went for it.  Like I said, not much to see here.  Just a quality holster that works.  


I've carried this holster with two different Glock 17s.  The first one I used it with was a Salient Arms International model with a large magwell.  Even with the large magwell the Eidolon's features aided in hiding it.  Admittedly, I got the Eidolon about the time it got cold so I've been dressing for cold temps.  If I only had a t-shirt, the magwell would have shown.  Moral of the story, if you're built like me there's not a holster out there than can conceal a full size handgun with a giant mouth magwell on it.  The Eidolon easily conceals a Glock 17 better than any holster I've used for appendix carry.  

As far as models, this is taken directly from the RCS website.

Models

  • The Glock 26/19/Universal model has a pass-through open bottom design and will fit any 3rd or 4th Gen Glock 9mm/.40cal pistol.  The holster shell itself is equal in length to a Glock 19 pistol.
  • The Glock 17 model has a closed bottom design, but will fit any Glock 26/27/19/23/17/22 3rd or 4th Gen.
Body Shield

  • The Ambidextrous Short body shield option can be configured for right or left hand shooters.  The body shield is cut to clear the hand completely but yet still help prevent clothing from entering the mouth of the holster and provide a visual and tactile guide for reholstering the weapon.
  • The Ambidextrous Long body shield option can be configured for right or left hand shooters.  The body shield extends to the rear of the slide to help protect the user from the weapon and the metal of the slide from the user.  The long shield is cut and profiled to minimize interference with a full firing grip.

UPDATE:  I've had so many questions on the body shield that I thought I'd update this.  The model I'm running has the full body shield.  I have no issues with it.  It's as comfortable as any holster and I think at times when drawing and reholstering the full body shield actually helps keeping clothes out of the way.  I'm a tall, slender guy and had reservations about the full body shield myself.  If/when I get another Eidolon, I'll get the full shield again.  I will caveat that if you're someone who hits the buffet quite a bit, I might try the half body shield.  I can't really say though if that would be better.  One recommendation may be to try the full body shield, and if you're handy enough....you could trim it down if you wanted.  This of course would void your RCS warranty, but that's on you.  


So let's get on with it, the beauty of this holster is the adaptability.  


The multiple holes seen here aren't for drainage.
They're for the several different mounting options
that allow you to run this holster ambidextrously
or with different attachment options.
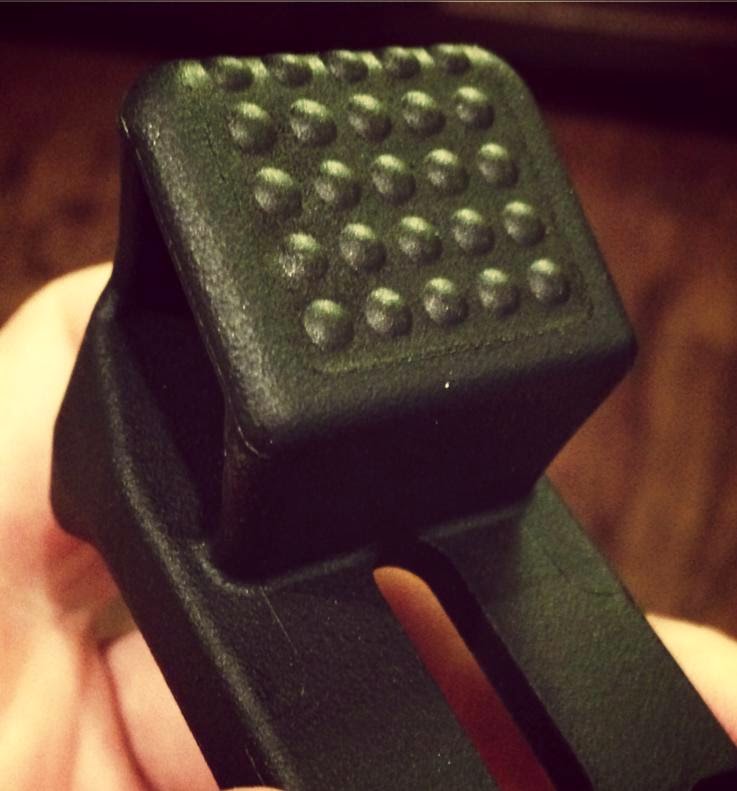
Seen here are the clips set up for right side
ambidextrous carry.  The "claw" looking object you see
of the left side of the holster as it sits in the picture is for
pushing the holster back against your body helping conceal
the handgun.
In this picture you can see just how close the Eidolon hugs the handgun
to your body.  Notice how the claw sits on the left of the holster.

Offset wings shown here for mounting similar to the Phantom.

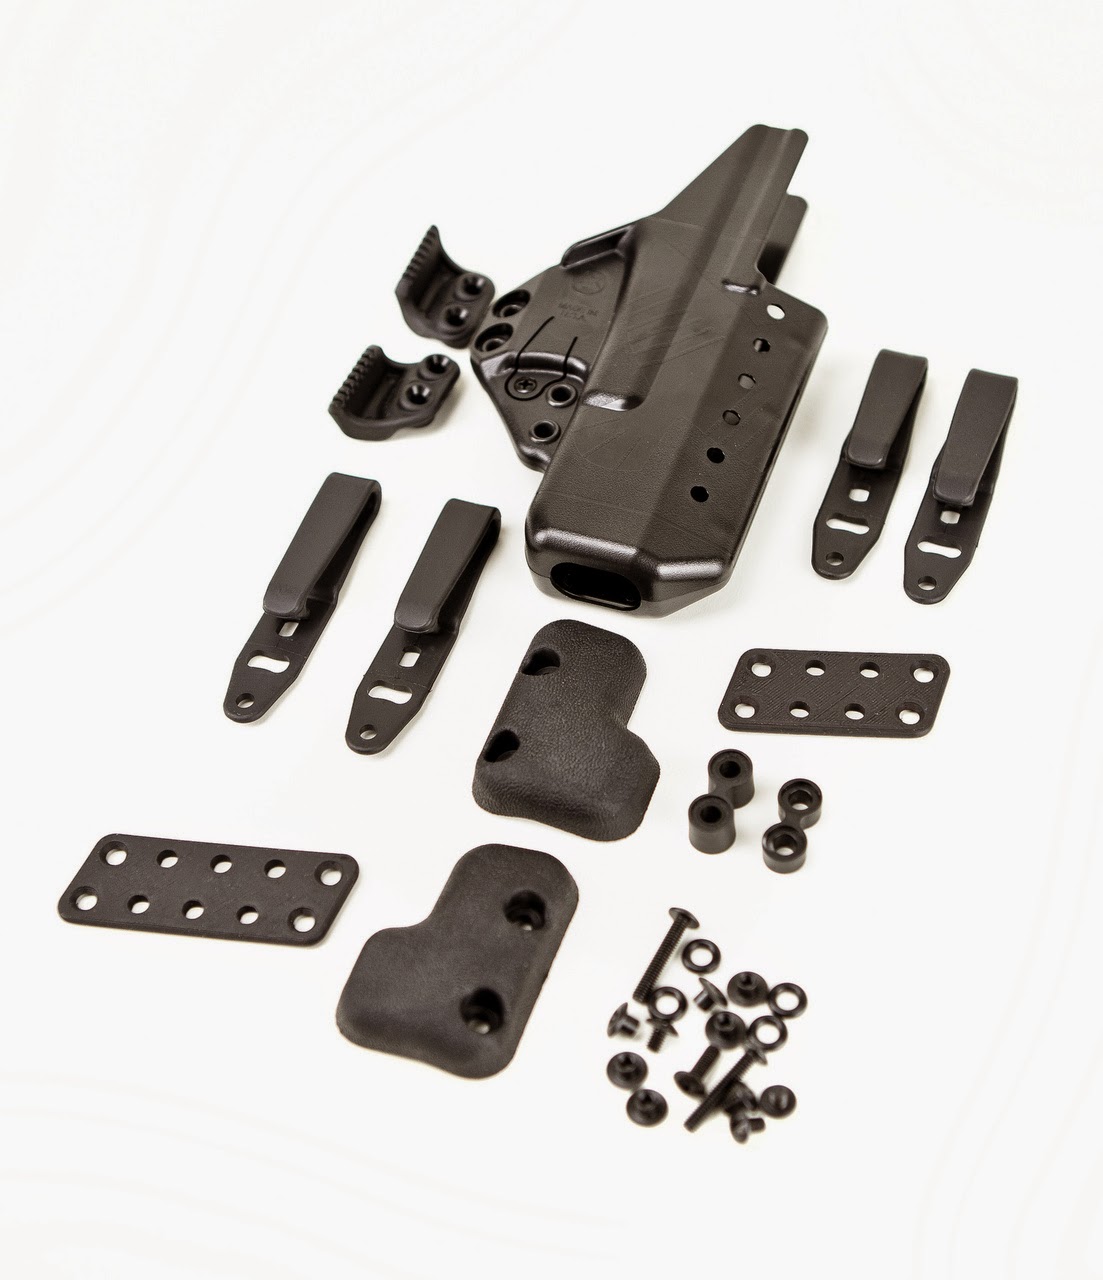
This shows the several different options for mounting
and options that help with concealment.  The "L" shaped piece you see
center of the picture below the "muzzle" of the holster aides in concealment.
The two pieces are so you can mount it to either side.  It will help push the muzzle
away from the body again helping the frame of the handgun push closer to the body.

Here the different mounting options are shown.

The Eidolon full kit pre-release is currently selling for $99.99.  You can buy cheaper holsters out there, but that's just what they are.  The versatility of this holster makes it worth several.  It's kind of a "one size fits all".  If you get it and decide you don't like appendix carry, then you have other options.  If you're in the market for a good holster for your Glock, you won't be disappointed with this one.  As far as other options besides the Glock, I'm sure they're coming.  I just don't know when.  Personally...I'll be standing by for the M&P model.


Wednesday, January 14, 2015

Harvey Deprimer Review

If you reload ammunition you know depriming can be a boring task at times.  I usually only used my Dillon 550 press to dreprime my brass as I reloaded, but recently I decided to deprime before cleaning the brass so that I get the primer pocket cleaned.  I also recently bought a Hornady Sonic Cleaner to help with the cleaning task, and they recommend you deprime the brass first.  So my only option to deprime prior to cleaning was to use my press.  As I'm sure you can imagine, this was a tedious task.  I had to load a piece of brass, rotate the lever, and then pull the brass out and put it away.  The additional part of this that was a hindrance was that the uncleaned brass left residue all over my press.  The process wasn't fast and kept me sitting at my press in my storage room for more time than I wanted.


Enter the Harvey Deprimer.  I found it just by searching the interwebs for a hand-held deprimer.  It's a simple tool machined from a block of aluminum with a black anodized finish and made in the USA.  Enough said.  And in fact, there's really not much to say about it.  It's a hand depriming tool that allows me to be in the house while I deprime.  This way I can watch TV or talk with the family while I do work.  It's relatively fast to use.

I'll explain it's use and some points about it through pictures.

First let me say that my dog is not impressed, f
or some reason he is somewhat alarmed as I use
it and stares at me with a concerned look.

I recommend having a container of some sort to use the deprimer.  Some of your primers
will just fall out of the tool and some will shoot out.  I use the container's top to set my
deprimed brass on.


Step 1:  Put your brass on depriming pin.  You'll want to "find"
the flash hole with the pin and make sure the pin seats.
Step 2:  Push the depriming pin with brass into the
body of the deprimer.

Step 3:  Press the lever into the main body of the deprimer.
During this, the pin will push the spent primer out.  As I said
before, I recommend having a container to "shoot" the spent primers in. 
You'll notice the pin popped through the primer pocket.

Step 4:  Rotate the depriming pin back out of the body of the
deprimer and you'll see that the primer has been unseated from
the brass.  At times the primer may be stuck on the end of the
 depriming pin, so just pluck it off withyour fingers.  Separate your
deprimed brass and you're ready to go again.


The process is that easy.  Go through those steps, rinse and repeat.  I only reload 9mm and .45 ACP currently, but have deprimed some 5.56 as well.  Below are some pictures of that just for show.  All in all, the Harvey Deprimer is a great tool that is built well and works well.  It retails for $49.95 plus shipping.  


Sunday, September 14, 2014

MagPod Review

I know several folks have been waiting to get their hands on this product, and I was fortunate enough to get a couple prototypes to try out so I'll share that experience with everyone who's waiting for them to be available for purchase.  A note on availability, the release date is supposed to be mid-October.  There have been issues with materials and availability, so kudos to the makers of MagPod for dealing with some people being upset over delay as opposed to pushing out and inferior product.


Now, the MagPod.  Basically it's a polymer replacement floorplate that will fit on Gen 2 and up PMags.  It weighs less than one ounce and is a handy piece of equipment.  It essentially gives you a monopod on your magazine.  It has a large "foot" at the lead of the magazine that offsets the angle of the magazine as you rest it on whatever surface.


I took the MagPod out and used it in both range and field environments.  Since I had two, I also did some weapons manipulation and mag changes with it.  I only found benefits in it's use.  The only thing that it really changed how I operate is that it somewhat affected my mag changes.  It didn't hinder my mag changes in any way, but it caused my hand position to change somewhat.  Due to the extra real estate the MagPod provides, it did give me a little more positive purchase on the mag when I did changes.

So how did it perform when placing the mag on a surface such as when you're proned out you might ask?  Flawlessly.  I don't normally push onto the mag when shooting as I'm not a huge proponent of it, but I had no issues doing it while using the MagPod.  I ran it with both my War Sport Ind. LVOA (check out their new website) and my Daniel Defense/Spike's Tactical franken-gun.


Let me just say, I had better pics and I even had video.  I screwed that up, so I'll post a few pics of the MagPod on here, but I recommend checking out the MagPod Facebook page for more.

It did help stabilize the rifle for follow-up shots when leaning forward into it.  Let me also say that you don't necessarily need to lean only into the MagPod for it to work.  With the large foot on front I was able to support the weight of the rifle and only slightly push into mag for it to be effective.  It doesn't give much side to side stabilization because it's not very wide, but you wouldn't want it to be any wider.

I found an unexpected benefit while using it in a field environment doing some bounding and shooting.  It had rained recently and there were some soft spots.  The Magpod with it's extra "footprint" kept the mag from sinking into soft ground and accidentally pushing any debris up into the mag.  While that's not a huge problem and not something I've had issues with, in some situations and certain environmental conditions that could be helpful.

Keep in mind you don't just have to be proned out to utilize it.  It can be utilized on barriers or any surface no matter what position you're in.  It's also pretty tough.  I put it through it's paces and it held up just fine.


All in all, is this something everyone needs.....no.  The MagPod isn't going to be for everyone.  Is it something most folks should try....yes.  It does have its benefits.  I think it's a great little piece of kit and I'll be glad to have them in my inventory for certain situations.  For me the biggest benefit is the stabilization it provides for follow up shots when able to load it on a surface.  I've been shooting AR style platforms for 17 years, so I'm used to shooting prone pretty well.  I'm hearing the retail on these bad boys should be around $20 for a 3 pack.  At that price, I recommend picking up a 3 pack once they come out and giving them a test drive.  Give Magpod a "like" on Facebook and standby for a release date.

Thursday, September 11, 2014

Mike Seeklander: Your Competition Handgun Training Program Review

As I make my way up in my career and get to the "management level" of things, I realize that keeping my skills honed will require some work on my own time.  So I've looked at getting into competition, particularly to join the three gun craze.  As with anything I do, I'm a researcher and am trying to be fully prepared to be successful.  If you want me to train defensively, I'm good with that all day long.  Competition is not something I'm familiar with.  So as a life-long learner, I sought a way to fill this gap.  Enter Mike Seeklander.  I believe it was Facebook where I noticed that he had a book out on the subject.


Mike has an extensive background and experience with firearms training and competition.  He's been an operational police officer, a U.S. Marine, Federal Air Marshal, and Federal firearms instructor.  He has a long list of accolades in the realm of competition shooting.  He also has free source of information on shooting at www.shooting-performance.com.  I highly recommend you check out his site for some good information on shooting and training tips.

For this review, understand that I've only read the book and seen the two accompanying DVDs that demonstrate the drills from the book.  I'll provide an update once I've gone through the program.  I'm going to break it down by chapters, but not give too much away because I recommend you get the book and DVDs if you want to follow the program.  

Chapter 1
Introduction to the Program-  In this chapter Mike basically answers any questions you might have about the program as far as how long it is and how much time it will take.  His program is designed for a whole season and is broken down by pre, post and during the season.  One nugget I'll give you here is that Mike uses his "6 modules of success" for this program; Visual Training, Mental Toughness Routine, Dry Fire Training, Live Fire Training, Match/Events and Physical Fitness.  The format of this book is great, and I like the way it's laid out.  You're going to be set up for success in developing a program just the way the book is laid out alone.  

Chapter 2
This chapter is all about goals.  Mike talks about just setting goals and the important step of writing them down.  I also recommend writing them and giving yourself something you can stick to.  Don't be unrealistic.  Mike breaks goals down into three types; End Goals, Performance Goals and Enabling Goals.  Goals are always important when you're trying to improve.  You have to set your sights on a mark that's achievable.  I usually recommend people have small goals that will lead to bigger goals.  You need to have some "wins".  It feels good to accomplish goals, so it may help you keep motivated along the way if you have some smaller "wins" to achieve as you journey to your larger goal.  

Chapter 3
Dry Fire Training-  Here's where we start getting to meat of the program.  This part includes your dry fire training guidance and drills.  Mike gives you all the guidance you'll need on conducting your dry fire sessions to include the drills broken down into sessions that are to be used 5 days a week.  Dry fire is a critical part of any firearms training.  The best part about it is that it's free.  No ammo cost.  The drills included here vary in difficulty level, but all are great drills.  

Chapter 4
Live Fire Training-  This is where the rubber meets the road, or where the bullets meet the target rather.  The drills here are broken down into sessions much like the dry fire ones, but there are also three phases of the live fire drills.  All designed to develop your skill set as you go along.  There are Micro Drills (small drills) and Macro Drills (larger drills with multiple skills).  Mike also breaks it down for you as far as how many days a week you train.  The recommended program is three days a week, Mike doesn't recommend less than two days a week.  You can do it five days a week or more if you see fit.  He breaks it down even further to pre session, during session and post session.  All the details you need are covered. 

Chapter 5
Mental Toughness Routine-  What's particularly interesting about this chapter is that it covers a lot of the principles that our sports psychologists work with us on at the course I work with.  Mike covers how he uses what he calls a "focus breath" which is something we use, but call it "tactical breathing".  It's also known as diaphragmatic breathing.  From there he talks about things like using a performance statement and visualizations.  All things that can be the difference in how well you perform.  Great tools for your kit.  

Chapter 6
Physical Fitness-  We know that physical fitness is important for overall health, but it's also important in dealing with stress.  Competition brings stress, therefore being in good shape will help you deal with it.  Not to mention some stages can be challenging physically.  No brainer here, get in shape and stay in shape. 

Chapter 7
Visual Training-  You'll learn drills to increase your visual skill.  There are drills here that will "exercise" your eyes.  I'm no doc, but I would imagine these are good for anyone these days as most of us spend a lot of time focused on a computer screen or other electronic device.

Chapter 8
Cross-Training Module-  Here Mike discusses how to cross train across different shooting sports such as Steel Challenge and Bianchi/Action Pistol.  

Chapter 9
Documenting Paperwork-  Here Mike covers the importance of documenting your progress.  Pretty simple, write it down.  Record it.  Otherwise how are you going to be able to keep up with how you're doing and improving.  Collect data and it will help you with adjusting your program as needed among many other things.  Mike also gives an example of some log formats you could use.  In addition, Mike has a log book you can purchase at this link.

Chapter 10
Game Day Performance-  Here Mike goes through how to prepare for a match and what to do during and after matches.  There is a wealth of information here.  Here is where you're going to get some invaluable tips to get you on the fast track to being successful at matches and meet your goals.  This chapter alone is worth buying the book for many shooters.  

Bonus Sections
Mike included some extras in the book as well.  He talks about setting up your guns and gear, sponsorship and a brief section on technique.  I found the sponsorship section particularly interesting because I always wondered how those guys get those cool shirts with all the manufacturers names on them.  At this point, my shirt is blank.  

So again, this book is laid out perfectly.  Everything is articulated very well, and I suggest getting the two accompanying DVDs in which Mike takes time to demonstrate the drills and talk through each one.  You'll pick up plenty of great training and match nuggets in these videos that aren't included in the books. 

Keep in mind I've been in the Army 17 years at this point and I know all about training and how to set up training programs.  My last few years have been as an instructor at the Special Warfare Center.  This book just makes it easy for you much like using an app or DVD for an exercise program.  It's too easy when it's laid out for you.  I recommend this book for everyone from someone at my level of experience with training to someone who knows nothing about how to train.  Think outside the box, don't just buy the book and think you have to do it exactly to the letter how Mike recommends.  I would recommend doing just that for most people, but if you know what you're doing this is still a great tool and you can use it to help guide your own program.  I'm actually in the process of creating my own logs in MS Excel that will work best for me since I've already decided how to attack my training.  

Bottom line, this book is worth it's weight in gold if your'e look to train for competitions.  This is a product of years of experience training and competing.  It's easily worth way more than the 35 bucks you'll pay for the book.  Even if you think you know what you're doing, get it.  You should always look for ways to get better or new methods to help keep your training fresh.  

So my message to Mike in all this is, thanks for sharing this wealth of information.  I greatly appreciate it.  Now get ready, I'm coming for you.  


Tuesday, August 5, 2014

Training Tips: Selecting a Trainer

Thanks to some personal experiences, observations and general internet silliness I've seen I wanted to throw some tips out there about what to look for in a trainer.  I applaud everyone who seeks out training with his or her firearms in any form.  Whether it be an experienced friend, a training center, or one of the many great trainers that are circulating around the country.  I just caution everyone to be careful about who or where they choose.  I do encourage people to always continue to get more training and education, as it will only help them get better whether it be learning what does or doesn't work for them.  There was a time in my career when I spent lots of time at the shoot house.  I always wanted to sneak my way up on the catwalk to watch other squads run through and I was always asking other folks how they would do certain things.  Some people thought I didn't know what to do, when in reality I was just always curious how everyone else went about their business.  I knew I would gather tidbits that would help me reinforce my techniques with what to do or what not to do.

Most of the courses out there are expensive.  Between the cost of the course, travel, ammunition and lodging if needed, things can get pretty pricey.  So doing your research is a necessary step.  When spending your hard earned cash, one of the more important things I would inquire about is class size.  You're going to pay good money for a trainer, so the instructor to student ratio should be low.  I would recommend a 1:10 ratio with 1:20 being the absolute maximum.  It also depends on the type of instruction going on.  For instance, a basic class may require more one to one time just getting the fundamentals down and corrected.  A more advanced class where you're working barricades or vehicles may not require as much one on one.  Correcting use of cover is a much quicker fix than working with someone on his or her grip.

Another topic is avoiding the "my way or the highway" style of training.  I've been blessed to be around some of the best shooters out there.  Not only competition guys, but guys that lives do and have depended on their abilities on many occasions.  I've always respected the trainers that would take the time to get to know the student's abilities and gauge their teaching off that.  Most of the instructors that I've seen who will try to "funnel" students into one method have little experience other than what they were initially taught.  The basic fundamentals are the same for everyone, but there are different ways to apply those fundamentals.  When working with a student, a good instructor will be able to adapt to whatever works for that particular person.  Whether that be their shooting technique or the instructors teaching methods.  When you get the trainer that insists on doing things one way, that's fine.  Just make sure that works for you and continue to see what's being taught out there so that you can gauge whether that's really it or there are other methods that may fit you better.  One example here is trigger pull/squeeze.  You will find slight differences in what several trainers teach on this topic.  There are several roads to get there, they're just not all the same.

Inquire how the instructor measures success.  Some classes tout how many rounds they fire in a weekend.  For instance, if a handgun only class fires over 800-1,000 rounds in a weekend I would be cautious depending on the instruction.  Pulling the trigger that much isn't going to do you any good unless you have a solid foundation.  I've seen folks brag about how many rounds they shot, which seems silly to me.  I would rather you shoot 20 rounds in a day rather than 200 as long as you get some solid work out of those 20.

If you're looking for a buddy to help you out, just realize that being proficient in a skill doesn't necessarily mean that person can instruct it well.  I've seen some great shooters that aren't able to effectively translate that to another person.  Most will admit it.  I on the other hand believe myself to be a really good teacher, and on some days at the range wish I could shoot as well as I could instruct.  It also takes a certain level of experience to be able to diagnose what someone is doing wrong and knowing how to fix it.

One other thing I would advise is good preparation for training.  Do your research on the equipment you'll need and be sure you're fully prepared whether you have to buy it or borrow it.  Also, unless your purpose for instruction is learning the basics....go to the range prior to the training and get some warm ups in.  Make sure you're able to bring your A game and get the most for your money.

Lastly, despite current tacti-cool trends.....a beard and tattoos does not a good instructor make.  Neither does multicam and velcro.  If you're going with someone who is supposedly a "reputable" trainer, ensure you do your research.  There are plenty of people out there claiming to be something they're not.  Along those lines, don't think you need a military or Special Forces guy to teach you marksmanship or tactics.  Plenty of folks that fall into that category need help as well.  I probably missed some good tips, so feel free to leave some comments on other things that would help those out seeking training.

Monday, June 23, 2014

Multitasker Series 3 AR Multitool

So this review is basically an update to the one I did on the Series 2 Multitasker, but I'll give plenty of detail since the one I did on the Series 2 seems to have disappeared.  There are several changes/improvements to the Series 3, but I must say I was really pleased with the Series 2 as you can see below.

Series 2 (left) Series 3 (right)

First of all, the Multitasker is built like a tank.  It's built with CNC machining out of solid billet steel material.  The G10 scales make for a comfortable, non-slip grip.  These multitools are some of the most solid out there.  That being said they are a bit heavy, which should only be a consideration if you're looking at a long haul and need to pack light or prioritize.  This multitool should be prioritized high in your kit though.  Just as a fully functioning weapon will keep you alive, this multitool will keep your weapon alive.

  
Series 2 (left)  Series 3 (right)

Series 2 (left) Series 3 (right)

In the picture above you can see the main differences.  The arrangement of the tools varies  slightly from the Series 2.  All tools seem to function just as well on the Series 3.  Below the difference in the pliers is shown.  These pliers are as solid as the jaws of life.  They've eaten through anything I've thrown at them so far and you can barely tell they've been used.

 
Series 2 (left)  Series 3 (right)


Below is the list of accessories and tools that accompany the Series 3 Multitasker taken directly from the website.
  • CNC machined pliers (D2 tool steel) - Not investment cast
  • Non-slip G10 scales (Black or Tan)
  • 3/8” hex for LaRue mounts
  • 1/2” hex for scope rings
  • Dual lug M4 castle nut spanner wrench + screwdriver
  • 3/32" pin punch with 8-32 male thread for OTIS cleaning kit compatibility
  • Radiused tip carbon scraper
  • 3" D2 tool steel knife blade - Plain edge or partially serrated
  • Pocket clip (removable)
  • 1/4" magnetic bit driver with M16A2 FSP adjuster
  • Includes these commonly used hex bits and a convenient bit carrier: No.1 Phillips, 3/32 Slotted, 3/16 Hex, 9/64 Hex, 1/8 Hex, 7/64 Hex, 3/32 Hex, T10 Torx, T15 Torx


Series 3 tool set easily attaches in place of the sight adjustment tool and functions well

Series 3 Blade

Bottom Line Up Front (BLUF):  If you own an AR style rifle you should own this tool and it should be in your range bag.  You will use it, guaranteed.  It's something you'll want two of so you can have one on your work bench and keep one in your range bag.  Military folks, your unit needs to buy some of these to keep in your range kit.  Everyone I've shown it to has been impressed.  I've used it for everything from quickie repairs to helping guys add accessories at gun shows.  The Multitasker MSRP is $180, but can usually be found from $140-$150 and F3 Tactical keeps them in stock regularly.